Kraken

- Buy, sell and trade 456 cryptos.
- Instant funding & advanced trading options.
- Join 9M+ users around the world.
Crypto day trading is where you make quick frequent trades within a single day or session trying to profit from short-term price fluctuations.
A lot of the time it involves trading with leverage, typically through crypto futures contracts.
It's a high-risk and complex trading approach that shouldn't be attempted by beginners. It demands considerable knowledge, experience and discipline to achieve consistent success.
If you've got previous trading experience under your belt, read on for a closer look at some common crypto day trading strategies as well as the risks to get across before you begin.
Also read: Crypto futures trading in Australia
This is not an endorsement of cryptocurrency or any specific provider, service or offering. It is not a recommendation to trade or use any services.
The objective of crypto day trading is to take advantage of intraday volatility and make a profit from short-term price movements. Day traders rely on technical analysis, order flow and even news releases to inform their strategies and make their trades.
Much of the time, day trading involves using leverage, which is where you use borrowed funds to increase your potential profits - which also increases your potential losses. The most common way to trade with leverage is to use futures contracts.
Futures trading is where you speculate on future prices going up (called going long) or down (going short). The beneit of futures trading is that you can profit (and lose) regardless of whether prices are rising or falling.
Short-term traders, also known as scalpers, generally operate on low timeframe charts such as the 1-minute or the 5-minute. Lower timeframe charts provide a zoomed-in view of the market and can help traders execute with precision and capitalise on a wide variety of setups, including market imbalances, ranges and breakouts.
This trading style can be profitable but also carries significant risk. It also requires knowledge, experience and discipline to become consistently profitable.
Day traders can sign up to any crypto exchange in Australia and start executing their strategy, however there are a few things to consider.
Firstly, trading fees (the spread) can be relatively high on standard exchange accounts. This is fine if you're only making a few trades a year, but if you're planning to day trade, you'll want to find the tightest spreads possible. In most cases, this means signing up to a professional or advanced account and sometimes paying a subscription fee. If you plan to use margin, you'll also need to sign up to a pro account.
Also read: The best exchanges for day trading
If you're planning on trading futures, your options are more limited. At the time of writing, only Kraken and OKX are licensed to offer crypto futures in Australia. In both cases, you'll need to register as a wholesale investor.
Finally, you can also trade crypto futures through contracts-for-difference (CFDs). Like regular futures contracts, CFDs let you go long or short (with margin) on various major cryptocurrencies. There are many regulated CFD platforms in Australia to choose from. While you wont typically need to sign up as a wholesale investor, you will need to first complete a questionare proving you're an experienced trader.
We currently don't have that product, but here are others to consider:
How we picked theseThere are countless day trading strategies and setups and each trader has their preferred method. We've outlined 5 popular and potentially profitable crypto day trading strategies.
When demonstrating setups, most traders will display high-volume breakout trades and drawn-out trends with high-percentage returns.
While these setups are great to know, the fact is that the majority of the time, the market is not in an explosive phase of volatility, but instead, a period of accumulation or consolidation.
Although they may be less aesthetically pleasing, accumulation phases and ranges can provide a way to profit and allow you easy entry into the market.
Identifying ranges is straightforward and can be done by plotting out a parallel channel with several touches and rejections on either side.
Ranges can form on any timeframe from the 1-minute to the daily and be used with any trading style. While it's good to monitor higher timeframes and understand what's happening on a macro level, these examples will focus on day trading and scalping.
Keep in mind that crypto markets are inherently volatile, so a 'low volatility' range can still be upwards of 10%. Always check the range width and adjust your position size and stop loss accordingly.
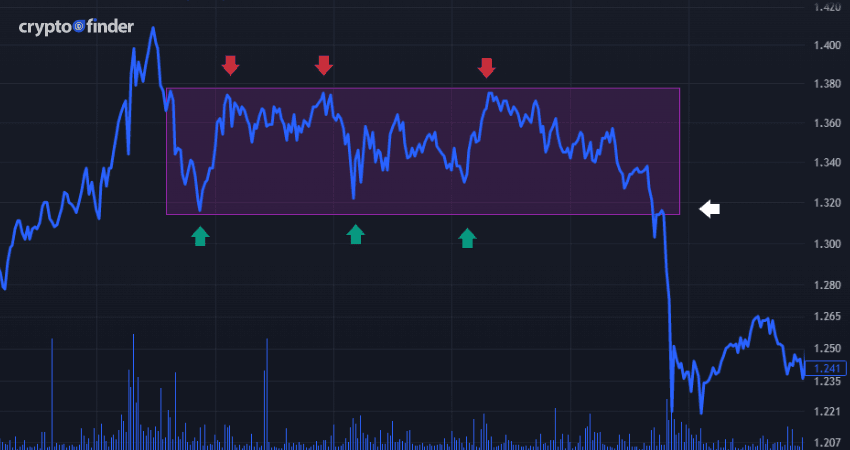
The example above depicts a relatively low-volume trading range with multiple long and short entries. As volume increases towards the end of the range, the bottom level is broken, and the market continues to the downside. Image: Billy Endres/TradingView
Executing range trades is relatively straightforward. By now, you should have drawn out your channel and will be ready to short tops and long bottoms.
As the market nears these levels, watch how the tape responds.
If orders are getting filled as usual and the order flow remains steady, you can start to add small size, set your stop loss and wait for a rejection to occur before pulling the trigger. However, if there is an influx of new volume and expansion candles, this could be a breakout developing. Be cautious and don't rush into trades you hadn't planned for.
If a boundary rejection does occur and the market is pushed back into the range, it's time to execute your trade.
Size your position, set your stop loss, and wait for the trade to play out.

"Scale into your position slowly as the market reaches the top or bottom of the range. Picking exact tops and bottoms is extremely difficult, and scaling in will help you get a good average entry price. If the range is compromised and volume starts to flow into the market, you should have a stop loss ready to execute or, if time allows, position yourself for a breakout trade. However, be careful not to rush or FOMO into your next position – a well-planned trade is a well-executed trade."
Well-planned range trades can help you maximise profits and minimise risk. Let’s look at example setups, stop loss and profit target placement, and introduce an important range trading consideration known as a wick-out.
Placing a stop loss while range trading is fundamental. If the range is compromised and a breakout occurs, this will likely happen quickly and on high volume.
It's better to get stopped out as soon as the breakout happens, rather than hesitating and getting caught offside.
Depending on whether it's a long or short setup, stop losses should be placed above or below the range with enough room for wicks and small fakeouts.
Make sure you don't position your stop loss too close to the range boundaries, as you will likely get wicked out.
Getting wicked out means your stop loss gets hit, only for the trade to then move in your favour. To help avoid unnecessary stop-outs, you can set a slightly looser stop and adjust your risk tolerance accordingly.
After the rejection is confirmed, you should consider moving your stop loss to break even or trailing it with the market. This will ensure you're not out of the money if a large order comes through and momentum swings.
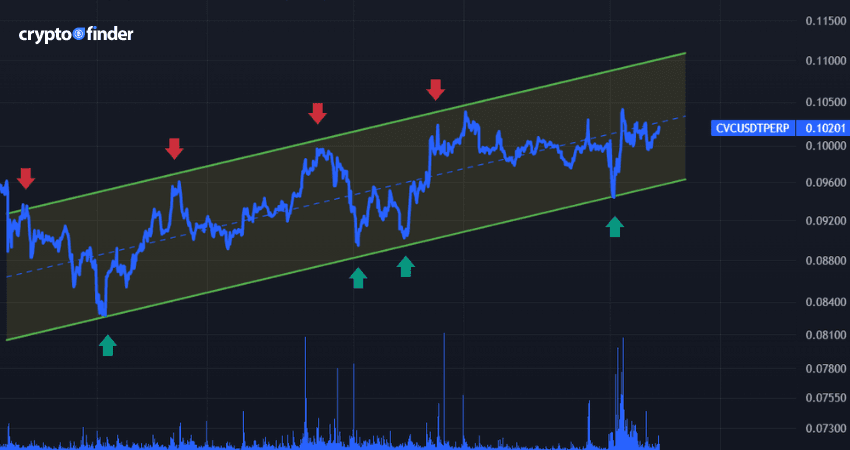
Above is an example of a trade where several wicks formed outside the range before being pushed back onside. This is why it is often best to scale into a small position (stopping out if needed) before entering with full size on confirmation of the rejection. Image: Billy Endres/TradingView
Once the rejection of the range boundary has been confirmed, you can sit tight and wait for the trade to play out.
Depending on your strategy, you can take profits at a fixed target or let the market run.
Ideal profit targets are midway to three-quarters through the range, but don't get greedy – a win is a win.
Remember to scale out and lock in profits. It's not uncommon for reversals to happen mid-way through trading zones.
Once you've locked in some profits, it can be a good idea to leave some size on your position or move your stop loss to break even.
If the market does reach the other side of the range, you can close the position or let it run into a potential breakout, depending on your strategy.
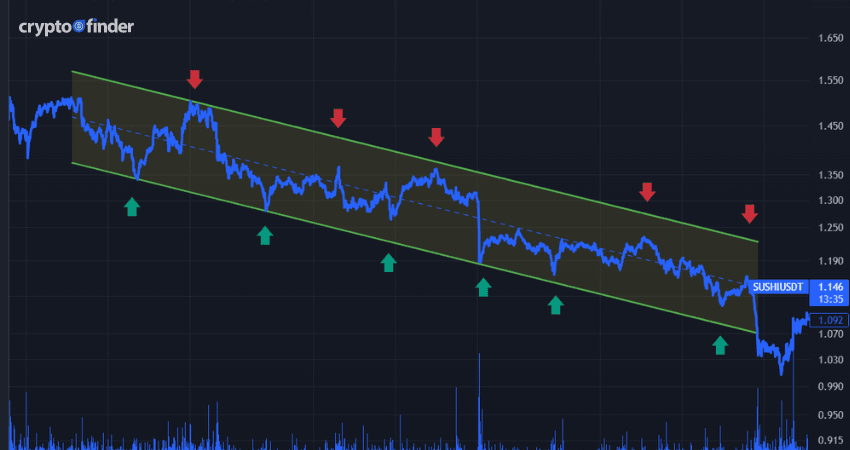
Although this is a clean range to trade, the entries are not perfect tops and bottoms. Scaling in and taking profits at about the midway point would have led to the most entries and successful trades. Image: Billy Endres/TradingView
Mean reversion, otherwise known as fading, involves trading over extended moves with the intention of taking profit on a market correction or reversal back to the average value or mean.
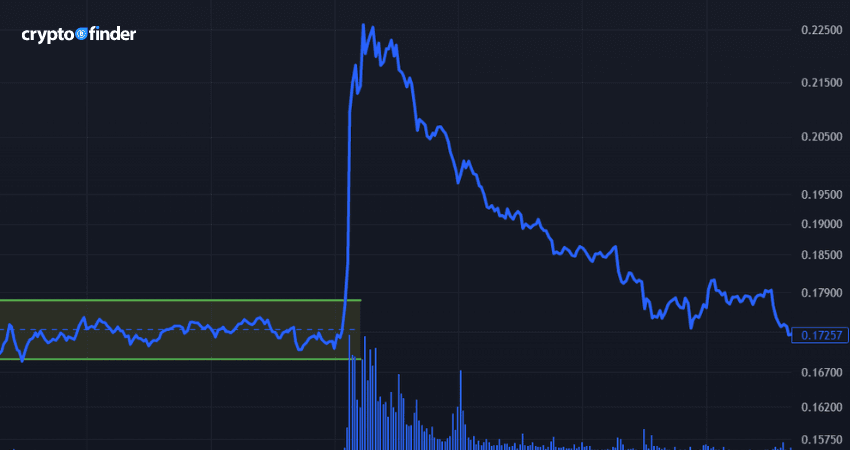
Image: Billy Endres/TradingView
Unlike range or breakout trades, the entry and exits on fade trades cannot be drawn out on a chart or plotted using technical analysis (TA).
That said, there are key signs to look for that can help identify mean reversion setups.
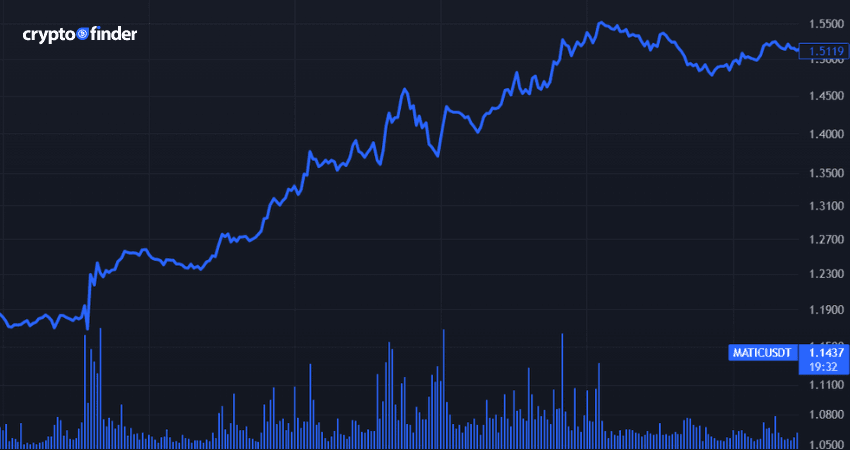
Above is an example of a trade on Polygon (MATIC) when a mean reversion strategy would be a poor choice. There are consistent high-volume spikes, and the market is trending with conviction. Image: Billy Endres/TradingView
Executing the perfect mean reversion trade can be difficult. It involves shorting tops and buying bottoms without getting caught offside.
This is when identifying volume and market sentiment plays a crucial role. Remember, if volume is flowing into the market, steer clear until it subsides. Patience is key.
Consider entering with a reduced position size, and if volume flows back in, cut your loss. It's less costly to re-enter a trade than to get caught offside – there's no saying how far the market may move.
If the market starts to revert to the mean and your position moves into profit, you can add more size if you're comfortable and your risk tolerance allows.
Mean reversion positions are some of the most difficult to manage and master. In this section, we'll cover how to place stop losses and profit targets and provide some tips on minimising risk.
Placing a stop loss for a fade trade is difficult, as there is no clear position like a range high or a key support level.
Stop loss placement for this trading style is arbitrary and will take time to master.
However, as demonstrated on the Waves (WAVES) chart below, stop losses should generally be placed slightly above what you perceive to be the fullest extension of the move.
This may be where volume dies down, the market consolidates, or wicks start forming, showing that traders are taking action and attempting to push the market back towards the mean.
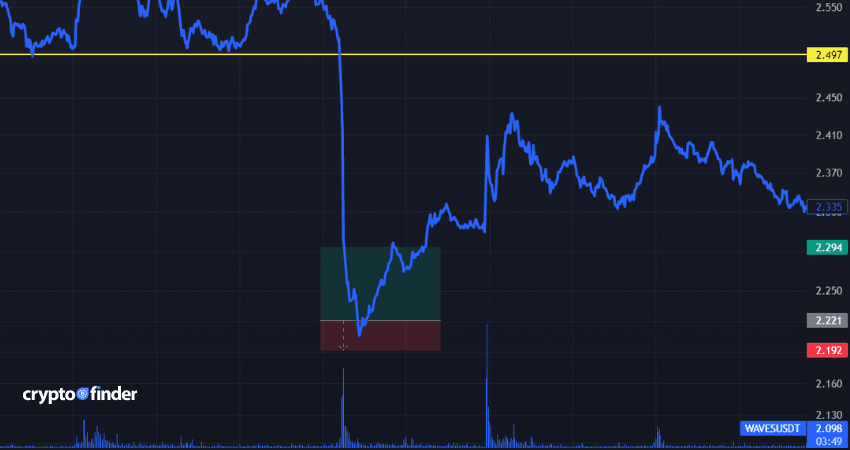
Image: Billy Endres/TradingView

"Once your trade is in profit, consider moving your stop loss to break even or trailing it with the market. Mean reversion trades happen with pace, especially on lower timeframes. If money starts flowing back in and the market shifts against you, it's better to have locked in small profits than see a once profitable trade get stopped out for a loss."
When trading mean reversion, lock in profits quickly. You will likely be trading higher than usual leverage, and it's a good idea to get in and out as soon as practicable.
It can also be a good idea to scale out of positions and incrementally take size off. Ideally, there will be a full reversion back to a profit target, such as a moving average. However, if, for example, you're fading the breakout of a trend, the market may be pushed against you and eat away at your profits as the breakout is realised and sentiment shifts.
Breakout trading is a common strategy used by crypto day traders and scalpers to capitalise on market expansion and increased volatility.
Well-executed breakout trades can give you early access to a shift in momentum and allow you early entry to newly forming trends.
Breakouts typically occur after a drawn-out range or period of accumulation. Volume is likely relatively low as traders wait for trend confirmation before entering with size.
Breakouts can occur on any timeframe from the 1-minute to the daily and be used in combination with any trading style.
If the range or level is compromised and volume continues to flow into the market, look to execute your breakout trade.
Remember that breakouts are rarely clean, as traders often make a last-ditch effort to push the market back and fade the initial move.
If this happens, watch the tape closely, double-check your stop loss and prepare to take some size off if you're uncertain.
If volume drops, it's best to close a portion of your position and lock in some profits.
Remember, you can always get back into a trade. However, being in profit and then taking a hit isn't great for confidence or your account balance.
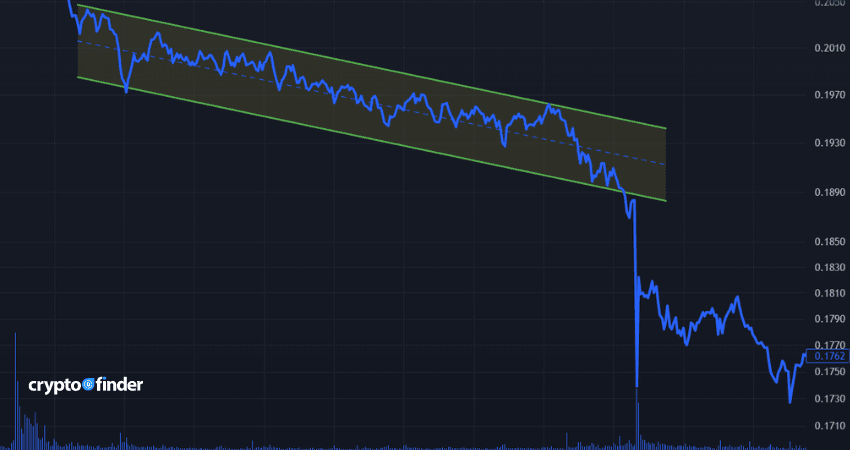
Image: Billy Endres/TradingView

"Consider adding small size before the breakout confirmation. This can help you gauge where to place your stop loss and get a feel for the market. Opening a position can also be a confidence booster, you know you're committed to the trade, focused and ready to execute."
In this section, we'll explore the mechanics of breakout trading and provide some tips for minimising risk and maximising returns through well-planned profit-taking and stop-loss positioning.
Placing a well-positioned stop loss is a crucial part of any breakout trade.
Although breakouts often look simple retrospectively, they are one of the most challenging setups to master.
If volume dies down and traders start closing positions, reversals can happen quickly resulting in a fakeout. If you don't have a stop loss set, you can quickly get caught offside and take a loss larger than you accounted for.
As shown on the chart below, stop losses for breakout trade setups are best placed inside the trading range or before the support or resistance level.
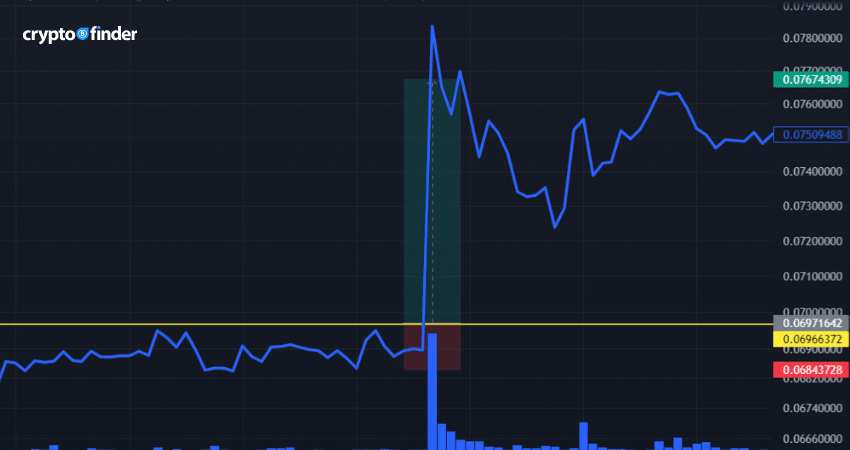
Image: Billy Endres/TradingView
If you're holding a position of significant size, it may be worth placing multiple, smaller stop losses. This will decrease your chances of slippage if the trade goes against you, as liquidity will likely be thin as many traders rush to exit the market.
Liquidity refers to the total value of resting bids and offers in the orderbook. If a market has low liquidity and you buy at market price or are stopped out of a trade, your order will be executed immediately at the 'best available price'. If liquidity is low, the best available price may not be optimal, resulting in an instant offside trade or a larger-than-expected loss – this is known as slippage.
Once the breakout has been confirmed and an influx of volume has hit the market, the compromised level will ideally act as the new support or resistance zone.
Depending on your strategy, you can take profits at a fixed target or let the market run, remembering to scale out and take profits incrementally.
Trailing your stop loss is also a good idea. Initially, to break even and then to the previous swing high or low depending on whether it's a long or short setup.
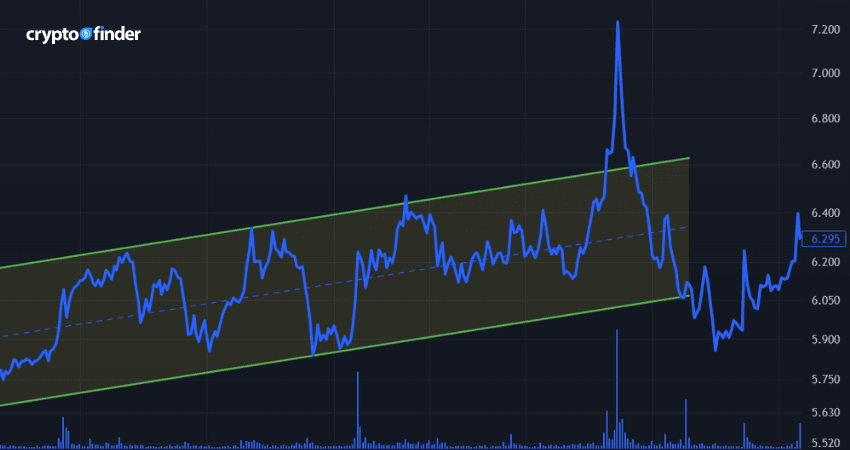
Above is an example of a breakout trade that didn't play out as expected. Despite all the signs pointing towards a clean breakout, the market was indecisive, and a reversal or fakeout occurred. This is why taking profits along the way, and after the initial breakout move can be a good idea. Image: Billy Endres/TradingView
However, breakouts are not without risk. They can be hard to master, and getting caught offside in a fast-moving market can be costly. When first learning to trade breakouts, use small size and focus on correct position management and stop loss placement..
The pullback trade is a trend trading strategy that aims to pinpoint overpriced or underpriced entries. These trades are best executed by recognising when the market has retraced to fair value and is likely to resume its trending state.
This strategy is well-suited to beginner and advanced crypto futures traders, as it can be used with high or low leverage and applies to different timeframes.
For this trade example, we will be scalping on the 1-minute chart using 3x Exponential Moving Averages (EMAs) to help with setup identification, trade execution and stop loss placement.
We'll use a longer-term EMA to gauge the underlying trend direction and 2 shorter-term EMAs to help monitor price swings and fair value.
Moving averages:
Combining these 3 moving averages will help eliminate market noise, identify trends and execute with precision.
Although you can adapt the EMAs and timeframes to preference, always test new setups with small positions and low leverage to see what works best with your trading style and risk tolerance.
Trend consensus. This is the most important factor when trading pullbacks. You are trading with the trend, so make sure it is established and strong.
The moving averages should have formed a well-defined upward trajectory, pointing at about 45 degrees.
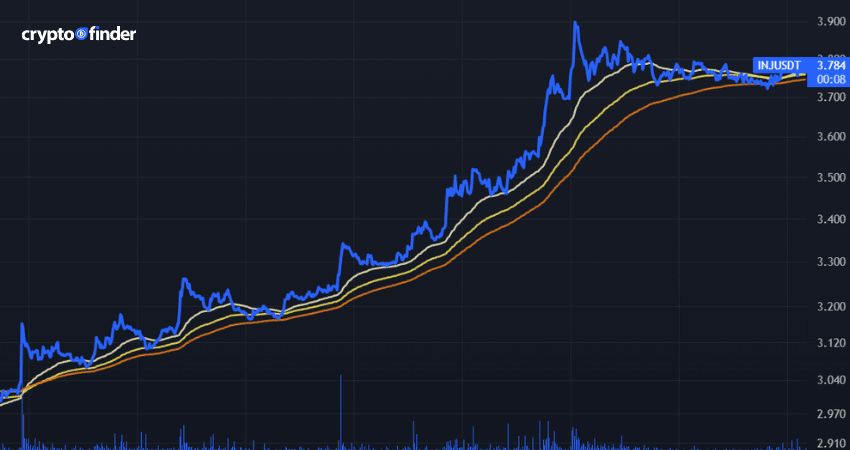
Image: Billy Endres/TradingView
Price action. The candles have been holding above all 3 EMAs; they will eventually reach a pivot point and start retracing.
Volume. There should be a consistent flow of volume throughout a trend. Avoid price spikes and low-volume periods – these setups are more suitable for mean reversion and breakout trades.
Recognising fair value. The market will naturally move in ebbs and flows. To avoid buying the tops and selling the bottoms, you want to identify short-term weaknesses.
The candles will eventually retrace to the 50 - 100 EMA, indicating that the market is trading around fair value.
Recognising these EMAs as a 'fair value guide' is a great way to keep you out of the market during choppy periods and forces you to be patient and wait for the right time to enter.
Support and resistance zones. You want to look for a pullback that tags the 50 or 100 EMA without breaking down the 150-period moving average.
The 150 EMA will act as a support or resistance zone – as long as it remains intact, so will the trend.
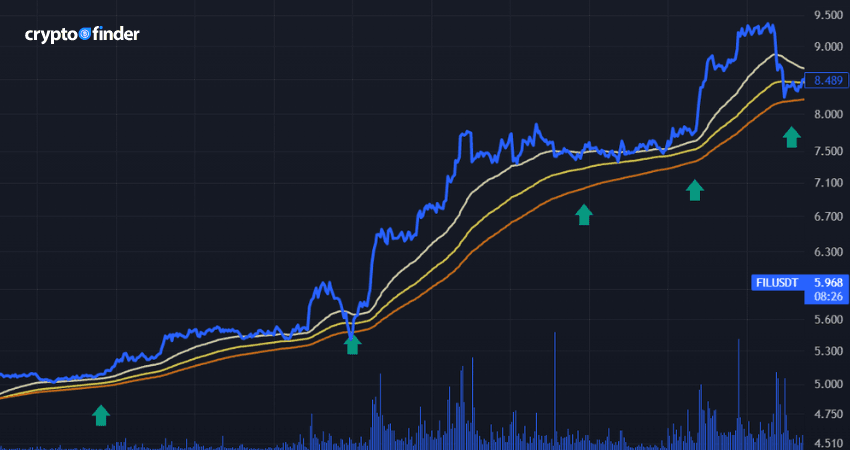
Image: Billy Endres/TradingView
Now that you've identified setups, it's time to start planning your execution.
You want to look for a long or short opportunity in the direction of the established trend.
Once confirmed, it's time to execute your pullback trade.
You can scale in slowly or add size as the market moves in your favour.
Be mindful of market volatility. Depending on the timeframe you're trading and the relative volatility of the trading pair, price swings can differ drastically.
Size your positions accordingly, stick with your trading plan and don't over-leverage.
Pullback trades are common in crypto futures markets as there's often a trading pair experiencing a trend day and increased volatility.
Practice using a small account balance and low leverage. Once you've got a feel for the pullback trade, you can begin to size up your positions and increase leverage.
In this section, we'll explore the various types of trend pullback trades and provide you with risk management and profit taking strategies to help capitalise on them.
Stop-loss placement for pullback EMA trades is relatively straightforward.
Although the primary purpose of the 150-period moving average is to act as a guide to display the underlying trend, it also makes for an ideal stop-loss zone for both long and short setups.
The 150 EMA will typically be around the swing highs/lows, meaning that if this zone is broken down, the trend may end, and the trade setup is likely to be void. The trade setup below shows where a stop loss would have been triggered following the breakdown of all 3 moving averages.
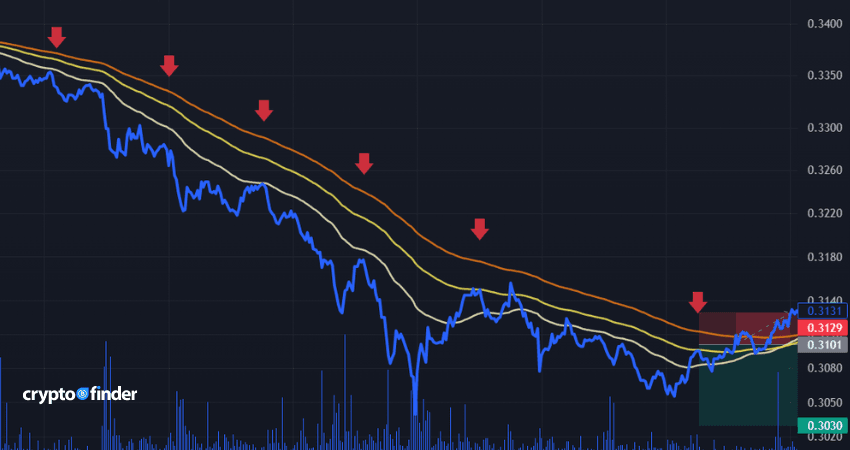
Image: Billy Endres/TradingView
If you want an even more precise placement, draw out a trend line that touches the swing candles' top or bottom, depending on whether it's a long or short trade.
This line should be relatively close to the 150 EMA. Position your stop slightly below the trend line, remembering to account for wicks.
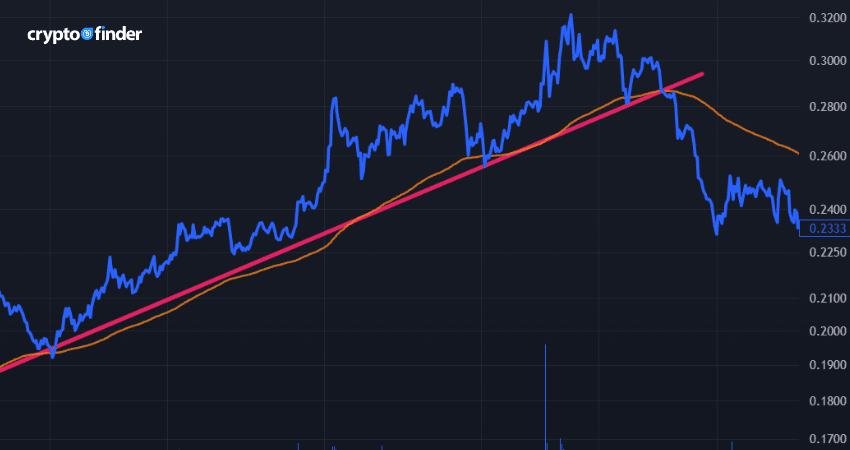
Image: Billy Endres/TradingView
Profit taking
When trading pullbacks, there is no right or wrong way to take profit.
Depending on your strategy, you may prefer to lock in profits as soon as there is a high volume push toward the prevailing trend or to scale out slowly as the market moves in your favour.
Fixed targets and Fibonacci retracements are also commonly used. However, they can be challenging to plan during fast-moving scalping setups.
To avoid unnecessary losses, consider moving your stop to break even as soon as practicable or set a trailing stop loss if the crypto exchange supports this feature.
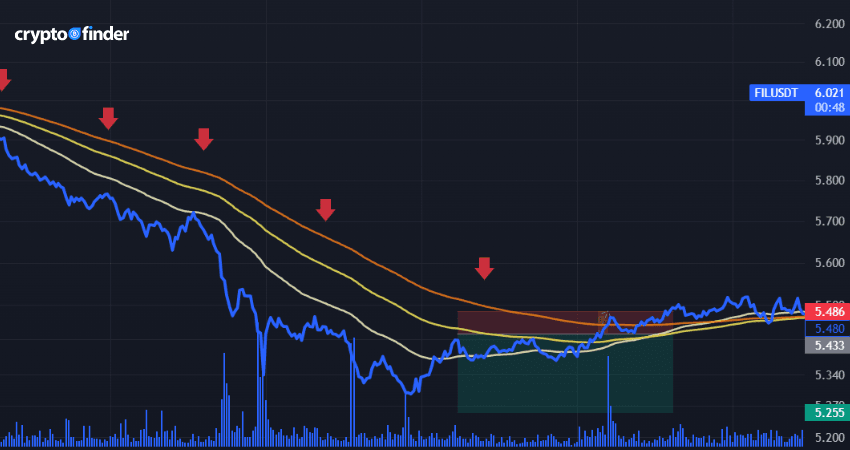
In the example above, trading a pullback setup, you could trail your stop with each swing high, remaining in the trade, adding size and taking profits on multiple occasions before eventually being stopped out. Image: Billy Endres/TradingView
Identifying setups is relatively simple when using the 3 EMAs, which also help with stop-loss positioning and precision executions.
Trade setups are frequent, especially on lower time frames, so you'll never be on the sidelines long when trading pullbacks.
The main risk when trading on low timeframes is the fast pace of the market and the use of high leverage that it often comes with.
If you're uncomfortable with charts as low as the 1-minute, consider moving to the 5- or 15-minute timeframes.
Trades will come around less often, but a slightly higher timeframe is a good starting point for feeling out the pullback trade and will allow you more time to plan your entries..
Market behaviour and price action around support and resistance zones are crucial to understand and recognise.
Support and resistance zones form on all timeframes and are one of the most recognisable setups due to the market's natural behaviour to retest key levels.
Levels that form on higher time frames are often stronger as there will likely be institutional money being traded here and an increased effort to defend price.
When trading support and resistance it can be worth zooming out to a higher timeframe. Levels that form on higher time frames are often stronger as there will likely be institutional money being traded here and an increased effort to defend price.
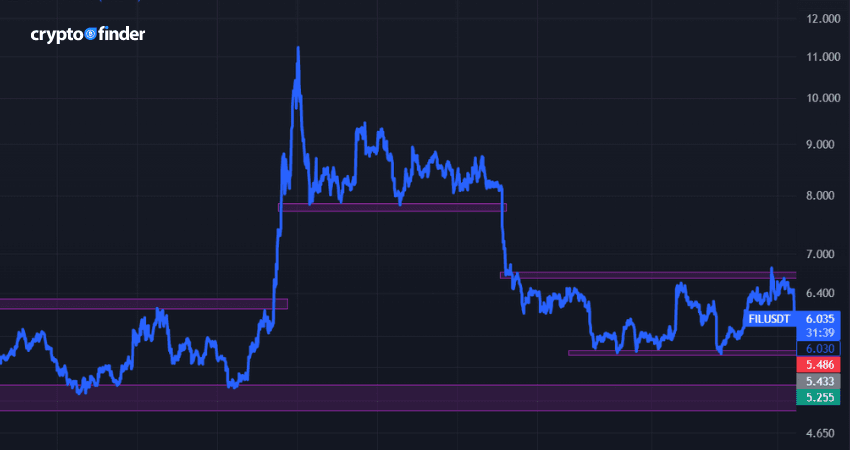
Image: Billy Endres/TradingView
Once you've plotted out your support and resistance zones and identified a potential setup, it's time to execute.
Trade executions will vary depending on multiple factors, including your trading timeframe, account size and risk tolerance. Depending on liquidity, you can enter a trade through a single market order or numerous limit orders.
In this section, we'll delve into the trade management of support and resistance setups and demonstrate profit-taking and stop-loss positioning.
Stop loss placement
Positioning stop losses for support and resistance trades is not difficult if your zones are drawn out correctly.
If you're trading short, place your stop loss outside the resistance high, remembering to account for wicks to the upside.
If you're holding a long trade, position your stop below the support zone, accounting for wicks and potential price spikes to the downside.
Support and resistance levels are often volatile, as some traders are looking to play a breakout while others are fading the move back into the zone. Sometimes it's best to have a looser stop and lower leverage to avoid wick outs. Once the trade moves in your favour, trailing your stop loss may be a good idea, as it can be hard to position a fixed profit.
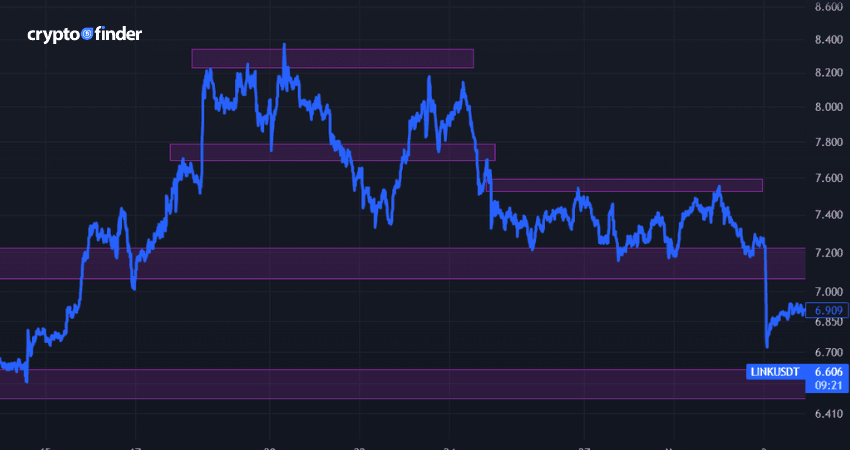
Image: Billy Endres/TradingView
The optimal place to take profits when trading support and resistance can be confusing and is a topic for debate.
While there is no 'perfect exit', it can be helpful to take profits incrementally. By closing a portion of your position quickly, you will reduce the risk of an offside trade and can choose to hold for a longer period.
If you're a risk-averse trader, trailing your stop loss can help. This will allow you to see your position and profit margin at all times, which is important for a confident trading mindset.
Support and resistance levels develop on all timeframes, so you're sure to find a position quickly. However, if the timeframe is higher, the level will likely be more recognisable and stronger.
When trading around support and resistance zones, the primary considerations are patience and risk management.
Entering a trade too early before the test of a level can result in a poor risk-to-reward ratio and eat away at your profit margins.
Risk management is especially important when trading these setups. Because you're trading around key levels, the market can break out unexpectedly and quickly. Make sure your stop loss is well placed and your position is sized according to recent volatility..
Crypto day trading is a high-risk, fast-paced style of trading that is not appropriate for everyone. Before starting day trading, make sure you're familiar with the markets and, ideally, have a demo or simulation account to trade on a reputable crypto exchange.
This manner of trading is particularly risky if you're using leverage, which can amplify profits and losses. The prices of coins and tokens can also fluctuate rapidly – sometimes within minutes or seconds – making it highly unpredictable.
Day traders aim to profit from these price movements, but they must also be aware of the potential risks of losing money very quickly.
By following proper risk management strategies, including using stop-loss orders and limiting position sizes and leverage, crypto day traders can reduce risk and increase their chances of success.
It is essential to thoroughly research and understand the risks involved in day trading and develop a sound strategy before you begin.
Before you get started with any kind of crypto day trading, make sure you've carefully weighed up the pros and cons.
While crypto day trading allows traders to take advantage of the volatile nature of the cryptocurrency market, it requires a significant amount of knowledge, experience and discipline to be successful and isn't suitable for everyone.
It is typically considered the highest-risk approach to crypto trading, and novice traders should learn the basics of crypto trading before attempting to day trade or scalp.
Proper risk management strategies, including using a reputable crypto exchange, are essential and can help increase your chances of success. However, day traders must always be aware of various factors, including high commissions, liquidations and fatigue.
Disclaimer: Cryptocurrencies are speculative, complex and involve significant risks – they are highly volatile and sensitive to secondary activity. Performance is unpredictable and past performance is no guarantee of future performance. Consider your own circumstances, and obtain your own advice, before relying on this information. You should also verify the nature of any product or service (including its legal status and relevant regulatory requirements) and consult the relevant Regulators' websites before making any decision. Finder, or the author, may have holdings in the cryptocurrencies discussed.
We reviewed more than 20 crypto exchanges to find you the ones best suited to day trading cryptocurrency.
Learn how you can use various short-selling strategies to further your Bitcoin profits.
You can trade crypto futures in Australia, but your options may be limited.
Compare a list of gold-backed cryptocurrencies.
Your detailed guide to cryptocurrency trading bots, how they work and the benefits and risks you need to consider when choosing a crypto trading bot.
There’s much to gain and lose in the volatile cryptocurrency market. If you want to make the best decisions, then you need to understand how to do a technical analysis. This guide from finder will tell you everything you need to know.
Learn about OTC cryptocurrency trading, what it is and how it works in this comprehensive guide.
Learn how crypto arb trading works and how to get started with this guide.
Find out what exactly bitcoin futures trading is, where to get started and how to pick the right trading site.