Finder makes money from featured partners, but editorial opinions are our own.
How to build a DIY Raspberry Pi arcade machine for retro gaming
Here's everything you'll need to relive the classic video game era with your own custom-built arcade machine, built around the super-flexible Raspberry Pi.
There's a certain mystique that attaches to the video game arcade. If you're of a certain age, which I am, they were the cornerstone of video gaming back in the day.
Home computers were still something of a novelty, as were consoles, but it's a sign of how important the arcades were at the time that so many home console and computer games touted themselves as "arcade perfect" conversions.
This was nearly 100% of the time a blatant lie, but you put up with what you could get at the time, while still storing your 20c pieces for those times when you could duck to the local arcade, bowling alley or takeaway joint for a quick go on the real thing.
These days, you don't need the 20c pieces. All you need to get a genuinely authentic arcade experience at home is a little set-up time and a few key components to build your home arcade machine of your dreams.
Here's what you'll need to make this a reality. While there are quite a few steps to take, I can assure you none of this is impossible.
I've built a few arcade machines over the past few years, and my own physical technical skills are such that I was once thrown out of my high school woodworking class to stop me from accidentally removing my own fingers on a bandsaw.
If I can do this, then you very much can. Build an arcade cabinet, that is. I don't recommend sawing off your fingers with a bandsaw.
What you'll need: Pick your Pi
There are a number of different approaches to building the brains of a home arcade system. You totally can repurpose an old desktop or laptop as the brains, or go the whole authentic hog and get into the pricey and often esoteric world of legitimate arcade board collecting and JAMMA interfaces.
However, the easiest road to take, and the one that I'm going to use for this guide, is to use one of Raspberry Pi's excellent low-cost Pi computers as the essential brains.
The Raspberry Pi is low cost, highly configurable and there's a considerable community built around using the Pi as an arcade machine's core already.
There are other simple board systems out there, many of them more powerful than the Pi (such as the ODroid boards), but the Pi is readily available and relatively rapidly updated to boot, making it the easy all-round choice.
Except that you do need to decide which Pi to buy, because there's a range of Raspberry Pi systems to consider when building out your home arcade system. I'm going to run you through using the Raspberry Pi 4b, but there are advantages to other approaches. Here's the basic rundown of what you should consider:
Model
Pros
Cons
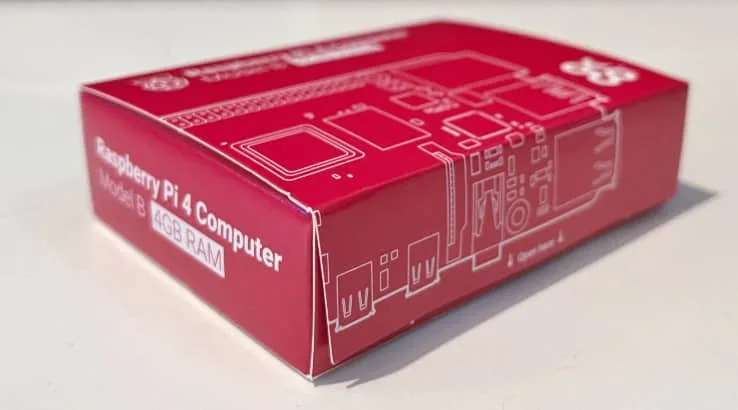
Raspberry Pi 4b
Best power to price ratio for current Pi boards.
Uses micro HDMI for display connectivity, so you'll need a converter cable.
Raspberry Pi 400
Keyboard built in, so it's easier to configure and works better for home computer emulation.
Larger body won't work with some arcade build styles.
Rasperry Pi 3b
Older model, so may be cheaper with some merchants. Uses full sized HDMI for video output.
Less powerful than the Pi 4 or Pi 400.
Raspberry Pi Zero
Much cheaper, smaller size and power needs make it good for portable emulation systems.
Seriously low power, so lots of arcade and 16 bit systems simply won't run.
The Pi Zero models are pretty good if you're building a Gameboy style system due to their lower power needs, but they're seriously underpowered for more ambitious game types.
The Pi 400 is a neat system in its own right, and great for other coding tasks or if you also want to run lots of 80s and 90s era PC/computer games that presumed a keyboard was present.
The Pi 4 is your current best bet as it's still a small board so easier to place in different enclosure types while remaining surprisingly powerful for its price point.
What you'll need: Cabinet picks
The Pi 4 is going to be the brains of your system, but then you need to consider what kind of arcade machine you actually want. I'm not talking games here, but the physical form factor of the machine you're going to build.
Back in the arcade's golden age, the vast majority of machines were built around a common sized screen and casing, which was big, robust – because kids beat the hell out of those things – and heavy. If you want the absolute authentic experience, it's the way to go, but it's also going to take up a lot of space in your living area.
Your next option is a smaller stand-up model, similar to the style that Arcade 1UP uses for its machines, at around a ¾ to ½ sized cabinet. You could also opt for what's usually called a "bar top" machine. These omit the entire base of the cabinet for something that you'll drop onto a desk, bench or bar, using that as the base.
Classic arcade machines had to fit those massive heavy CRTs, hefty power supplies and large arcade boards into them, but these days we can miniaturise matters down considerably.
Now, you totally can head to your local timber yard, grab any of the many available online drafting plans and cut out everything you need if you're so inclined. If so, take it slow and careful, and always measure twice and all that.
The good news here for those of us with less woodworking ability – like me, for example – is that there are plenty of options for what amounts to "flat pack" style arcade cabinets. If you can assemble IKEA furniture, you can tackle this part too.
There are arguments for all approaches, and price points to match.
Expect to pay around $100-$200 for a flat pack bar top kit, around $300 or so for a coffee table style flat pack, and more for lowboy or full sized kits, painted or not.
Bear in mind that the flat pack kits typically don't include front glass, and many are just raw materials, so you will need to consider the costs of those, especially if you want fancy decals or the like.
Another option here – and again, I've done this myself – is to buy an old non-working cabinet and use its existing set-up as the basis for your "new" arcade machine. Just make sure that the cabinet itself is in decent condition before you start, and that it's not going to be excessive work to remove unwanted components.
If you're really cramped for space, you can opt to build a stick-based arcade machine, or even go the ultimate budget option of just having the Raspberry Pi sit as its own standalone box. That's considerably cheaper and a lot more portable, but you don't quite get that classic arcade "feel" that way.
What you'll need: Display, controls and everything else
So far, you've sorted out the brains of the new arcade machine, and where it's going to live. Now you just need a few more key components before you can get to blasting away.
First up, your screen. Classic arcade systems used displays that were generally between 19 to 25 inches in size, but typically with a 4:3 ratio, as was the style at the time. If you want the absolute classic arcade experience you can try to track down an arcade CRT and go through the messy process of wiring through its connections via a converter board, if you're super keen.
Most of us probably won't be, and the easier way to handle that part of the equation is with a newer LCD monitor. There's a solid purists argument here – even with scanline filters an LCD is not going to look exactly like a curved CRT no matter what you do – but for most users it's a sufficient compromise, especially as it's often cheaper and much easier to connect up.
The size you use will depend on your cabinet size; most decent kits will indicate the screen size they're built for or capable of taking. Bear in mind that some LCD monitors have wider measurements than their diagonal size might indicate, and you've got to fit their bezels into place too. Most systems will fit a 19-inch pretty comfortably, and ideally you want one with a direct HDMI input to keep matters simple. Also keep in mind that in most cases you're going to chuck away the monitor stand itself, and instead mount the screen within your arcade box.
If you do have an older LCD you want to repurpose and it doesn't have HDMI, you're not entirely out of luck – you can (and again, I've been down this path) use a DVI to HDMI adapter or VGA to HDMI adapter to hook up your Raspberry Pi. Bear in mind that screen resolution and refresh rates may play a part here, although for most classic arcade titles you're not exactly talking 4K resolution anyway, so this won't often be a big issue.
If you're building your arcade system from a Pi 3, all you'll need for video cables is an HDMI cable. However, the Pi 4 uses a micro HDMI interface on the board, so you'll either need an adaptor or a full-sized micro HDMI cable to connect with.
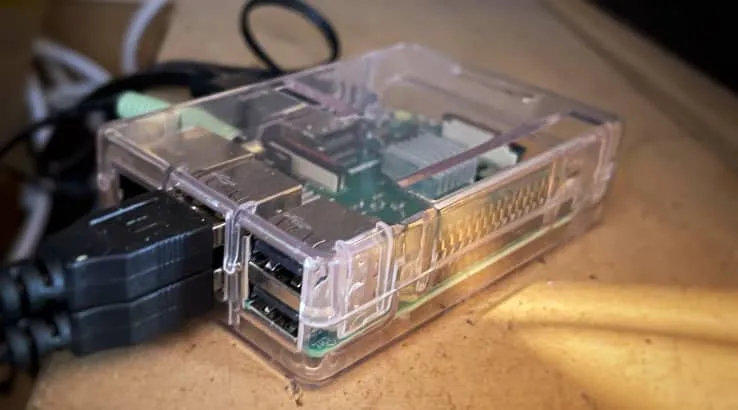
While you can run your Pi as a bare board within your arcade machine's enclosure, it's a much better idea to place it in a case, and preferably use a heatsink and fan.
Arcade emulation is within the Pi 4's scope, but many titles – and some emulators – will push it to its limits in a thermal sense. The Pi 4 is smart enough generally to scale itself back or shut down rather than release its blue smoke and kill itself, but you don't want that when you're chasing that next elusive high score.
You're also going to need some storage, both for the operating system of your new home arcade and the actual games themselves. The Raspberry Pi systems use standard microSD cards for storage, which is great news as even moderate capacity cards are entirely affordable.
I'd suggest 32GB as a bare minimum, but depending on your appetite and system preferences you can easily scale that up to larger cards to match your needs.
You'll also need some way to read your microSD card on your primary computer. If your PC or laptop has an SD card reader you probably don't need any extra hardware here, as most microSD cards are sold with full-sized SD card adaptors. Pop the small microSD card into the full-sized adaptor, and you're good to go. If you don't have an SD card reader for your PC, the easiest route there is to buy a simple and cheap USB microSD card reader.
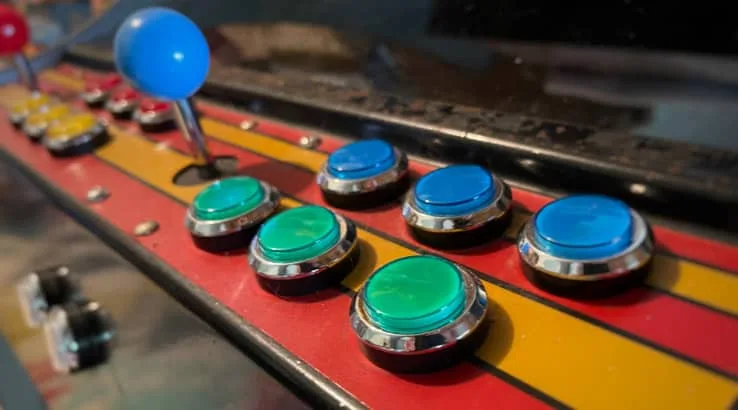
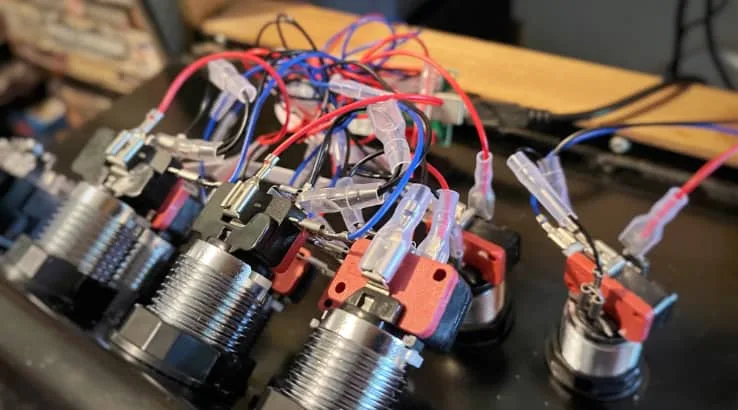
Then we come to controls. If you want super simple, it's entirely feasible to run an arcade system from just about any USB connected gamepad. That will work and can be a good bit of hardware to have around when you're setting up or troubleshooting, but for that authentic arcade experience, a good joystick and buttons is the way to go.
The sky is somewhat the limit here, because you can go all out with trackballs, steering wheels, pedals and yokes if you like. Bear in mind that if you're using a flatpack kit, you may be limited in terms of button numbers and placements unless you're willing to cut additional holes or add different top plates for additional joystick parts.
If you're just starting out, a regular six button-per player set should be all you really need.
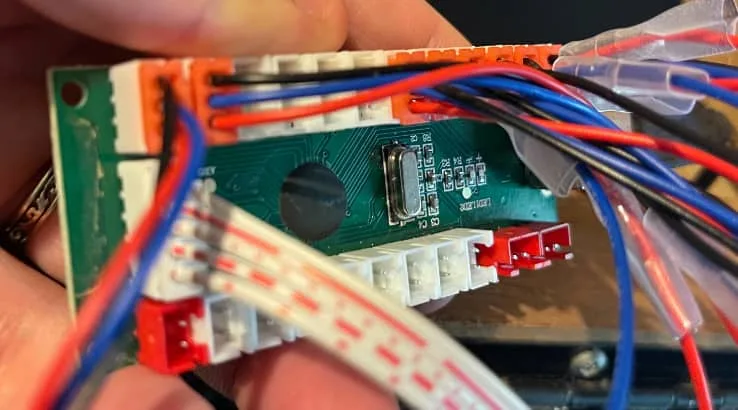
If you are using a gamepad then the wiring and connectivity is easy, because it's direct USB. If you're using a joystick and buttons, you'll need an encoder board for every set of controls you want to run.
Many joystick kits will come with this board ready to roll, as well as the wiring you'll need. If yours doesn't, you'll need to get at least one (and preferably two – arcade games are more fun when they're competitive!) USB encoder boards with cabling.
Classic arcade cabinets attracted the punters in with flashy visual attract modes, but also plenty of sound. The Raspberry Pi is an incredible machine in many ways, but it's not equipped with its own speakers. Luckily you don't need high-end audio for this project – a simple set of cheap powered speakers with a 3.5mm input should do the trick.
Finally, you're going to need to get some volts into your Pi 4. The primary interface on the mainboard is simple USB C, but that doesn't automatically mean that the Pi 4 will talk happily to any old mobile charger you have lying around.
The official line from the Raspberry Pi foundation is that the Pi 4 needs an adaptor with 3 amps output and around 5 volts; there's an official power supply that meets this and a number of third party ones that match it.
You can try to use an existing mobile adaptor and see how you go, but if you start having power symbols flash up when you're playing or sudden shutdowns, it's almost certainly going to be your power supply at fault there.
Software time: Meet Retropie
Now that you've got your hardware all ready, it's time to configure the software that's going to run on the Raspberry Pi of your choice.
For this I turn to Retropie; while there are other alternative arcade systems out there, Retropie combines a whole bunch of emulators and code together in a way that makes it nearly effortless to set up your new system.
The Raspberry Pi is meant to be all about the exploration of coding, so if you do want to hand-assemble your own code, emulators and everything else, don't let me stop you. Knock yourself out – but be aware that there's an easier way.
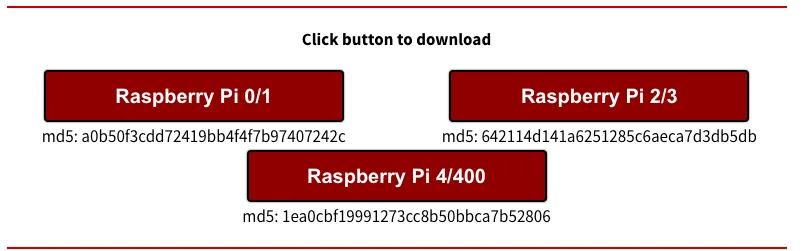
Retropie is available for download at the official Retropie site with images for the Raspberry Pi 4/400, Raspberry Pi 2/3 or Raspberry Pi 0/1 available for download at the time of writing.
Head there to the download page and click on the button that corresponds to the model of Raspberry Pi you have.
The download is not a small one; at the time of writing the latest version of Retropie for the Pi 4 was an 886MB download, so if you're on a slower broadband connection it may take a while to download to your computer.
The Retropie folks have a nifty video that runs you through the install process, and I'm not going to reinvent the wheel here.
While it's based around the older Pi 3b, the basics are still entirely applicable for the Pi 4, outside the difference of the Pi 4's micro HDMI cable.
If you prefer your instructions in video form, you can find them here:
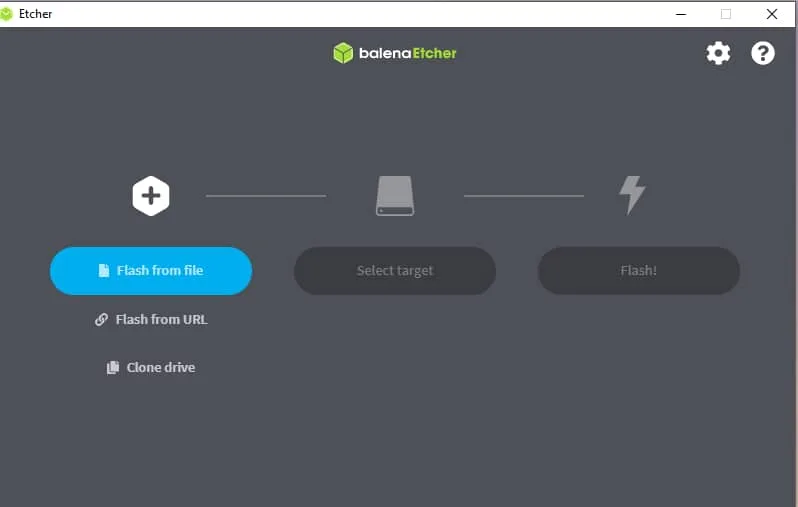
The basics of setting up the Retropie image involve flashing the software to your microSD card. There's a number of utilities that can handle this, but I'm going to recommend Balena Etcher, a cross-platform OS image flashing utility that can run on Windows, Mac or Linux computers as needed. You can find it at the Etcher site here.
The process of flashing the Retropie image is pretty simple:
Insert your microSD card into your PC's SD card reader or USB card reader.
Download Etcher for your computer's operating system.
Install Etcher and run it.
Choose "Flash from file".
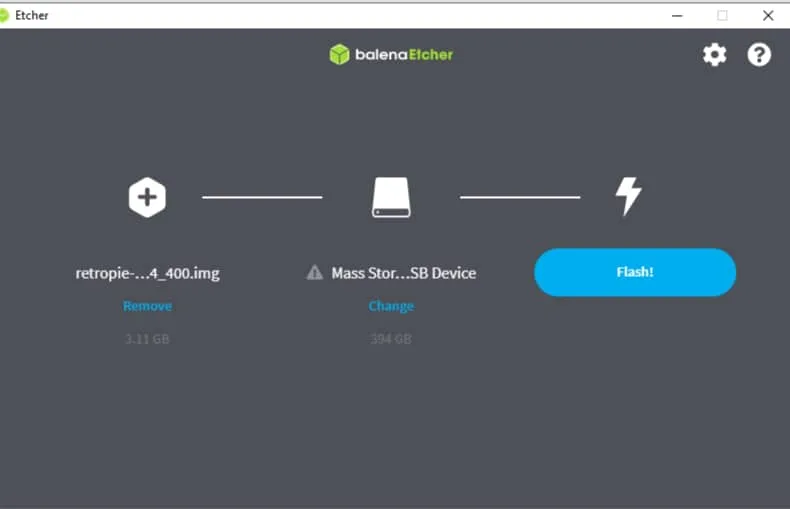
Locate wherever it is you downloaded the Retropie image from. The file should be in the format "retropie.img" with some variance in naming depending on when you download it. For this article, I'm using an image downloaded as retropie-buster-4.7.1-rpi4_400.img. Open the image.
Etcher will ask you for the target drive. IMPORTANT: This MUST be your SD card. Triple check that it has picked the correct drive, because it's going to totally overwrite that location. Etcher is usually pretty good with this, but you do NOT want anything to go wrong here. It should nearly match the capacity of your card (slightly smaller due to esoteric computer counting requirements) and match the file location of your drive as well. Do not merrily skip through this stage without making 100% sure you've picked the right drive.
Click on the "Flash!" button. It may warn you if you're using a larger card to make sure. Are you sure? If so, tell it so and it should run through the process of flashing the image to the card.
Depending on the speed of your computer, card and card reader this may take some time. Go make yourself a coffee.
When it finishes, your computer may well pop up a warning that it can't read the disk, and wants to format it. Ignore this – while it's true that (for example) a Windows 10 PC can't read the disk, that's because your microSD card is actually now formatted for Linux systems. If you format it now, you'll undo the entire flashing process and have to start over again.
You should see a screen telling you that Etcher has completed the flashing process successfully. If this fails, try downloading the image again and reflashing it to the same card; it's possible that it could be a faulty image, or possibly a faulty card or reader.
You can now eject your microSD card from your computer. It's time to get building.
Putting it all together
We're almost in the home straight now, because everything (save one component) is ready to roll. It's time to put it all together.
First of all, assemble your cabinet enclosure. Most flat pack kits will come with instructions, but this shouldn't be much more than carefully screwing together sides and front panels and the like. Depending on the make of your kit and how easy it's going to be to access the front panels, you may want to hold off on complete construction all at once while you line up your display, joysticks and power supplies.
Then you need to place and connect your joysticks and buttons. This is a somewhat fiddly task, with each button typically requiring its own wiring through to your USB encoder board. If you opt for self-lighting buttons there'll be additional wires to deal with here. Again, for some kits, it may be preferable to wire all this in first before you put those final screws in place.
For the display, it will vary based on the size of your screen and the enclosure you have. Make sure that the screen is firmly mounted in place – you don't want a sudden jolt mid-game to send your screen crashing down to the floor! One tip here if your kit doesn't quite seat your display firmly but it still fits, is that you can always build a screen-holding rig out of spare wood and holding screws. Even my rudimentary, thumb threatening woodworking skills have managed that more than once.
Place your Pi in a safe location within your arcade cabinet. Again, there's some variance here with cases that may provide a shelf or nook for it; it's also feasible to fasten it in place with careful screw mounting or have it sit on the "floor" of your cabinet if your cables allow.
If you've got enough space, having a small power board within your cabinet can also be a good step to keep clutter-free, given that you'll need to power your Raspberry Pi, your speakers and your monitor as well. Depending on your kit there may be a simple hole to run a power cable out from, or you can always carefully drill or cut one out yourself.
Place your freshly-etched SD card into your Raspberry Pi, and connect up your HDMI cables to your display, your joystick encoders to the Pi's USB ports and your speakers to the 3.5mm jack on the side of the Raspberry Pi. Switch on your power and let the Raspberry Pi boot up.
You'll see a bunch of command-line code flash past you – that's perfectly normal – and you should eventually see the Retropie splash screen and EmulationStation splash screens after a short while.
On first boot you may also see a notification that your filesystem is being expanded; if you've got a larger card it may not have allocated all the space available on your card when you were running Etcher.
Let it do this step, but if you missed it and you work out you're missing space you should have, you can always head into Raspi-Config from the RetroPie menu, then Advanced Options and finally Expand Filesystem to force this.
Your controller or controllers should be detected as well, and you'll be asked to confirm their inputs. This is a slow process of pressing each button in turn to set it up. For a standard six-button joystick input you won't have every button it asks for, but some gamepads will have every single one. If you hit a control you don't have, hold down an already-assigned button for a few seconds and it should skip past it.
From there, you've got a barebones Retropie system all set up and ready to run!
Hang on. You seem to have forgotten something. Where are all the games?
What you'll be faced with based on this guide is the Retropie menu and… not a lot else. You can further configure your system for details like WiFi – highly recommended – but not actually play any games just yet.
That involves getting some games onto your system, and this is where it gets legally quite tricky, especially for Australian gamers.
The games: Not as legally simple as you might think
If you don't own anything and figure that it all applies as "abandonware", then… well, it's simple, you're totally wrong. Unless a copyright holder explicitly releases games software into the public domain, then the copyright ownership resides somewhere. Figuring out where can be tricky, but there's no such thing as abandonware for software, or the right to only have a game for 24 hours or any of the other commonly stated legal fictions that surround this kind of activity.
Now, you might think that this is okay, because you do happen to own original games software that you'd like to also run on your new arcade machine. Sadly, even there, the legal reality in Australia is fairly cut and dried.
Even if you do own original arcade boards, cartridges or discs of your favourite games, you're absolutely not entitled to make ROMs of them on that basis.
It's a somewhat archaic position – if you own a book, an LP or a videotape then you can digitally transfer that content as long as you maintain ownership of your original media – but not video games.
As such, while it undoubtedly happens, it's not legal to run most ROMs on emulators in Australia, including on a Retropie system.
The legal position of emulators themselves appears to be largely untested; it's likely that any system that requires a specific (and copyrighted) BIOS to run that emulator wouldn't be legal, for example, because the BIOS itself is copyrighted software. Emulators that used a totally reverse-engineered position to run would be on more solid legal ground in and of themselves.
That being said, there's little in the way of obvious enforcement of that copyright for individuals who are not actively involved in distributing that game code that we've been able to unearth in Australia.
It doesn't mean that a copyright holder couldn't opt to enforce their rights, however, and the penalties can be stiff.
Equally, there are games and systems where you'd be in the legal clear, through the use of legal reverse engineering rather than BIOS use, "homebrew" games released as open-source projects and even a few games and systems that now sit outside copyright, such as the Vectrex.
Basically, there is legal risk involved with running copyrighted game code on a Retropie, and it's up to you how comfortable you are with that risk. I can't point you towards where you'd need to source game files, even though the underlying Retropie system itself is perfectly fine to set up from a legal perspective.
A multi-award winning journalist, Alex has written about consumer technology for over 20 years. He has written and edited for virtually every Australian tech publication including Gizmodo, CNET, PC Magazine, Kotaku and more. He has also been the Editor of Gizmodo Australia, PC Mag Australia, CNET.com.au and the Tech and Telco section at Finder. Alex has a Bachelor of Arts from the University of New England and a serious passion for retro gaming.
A maverick teacher uses poetry to embolden his boarding school students to new heights of self-expression. Here's where to watch Dead Poets Society online.
Follow the aristocratic Crawley family and their servants in the post-Edwardian era. Here's how to watch the Downton Abbey TV series online in Australia.
Does Dreamworld still deliver a good theme park experience if you're looking for things to do on family holidays to the Gold Coast?
Feedback
How likely would you be to recommend finder to a friend or colleague?
0
1
2
3
4
5
6
7
8
9
10
Very UnlikelyExtremely Likely
Required
Thank you for your feedback.
Our goal is to create the best possible product, and your thoughts, ideas and suggestions play a major role in helping us identify opportunities to improve.
Important information about this website
findershopping.com.au is one of Australia's leading comparison websites. We are committed to our readers and stands by our editorial principles
We try to take an open and transparent approach and provide a broad-based comparison service. However, you should be aware that while we are an independently owned service, our comparison service does not include all providers or all products available in the market.
Some product issuers may provide products or offer services through multiple brands, associated companies or different labeling arrangements. This can make it difficult for consumers to compare alternatives or identify the companies behind the products. However, we aim to provide information to enable consumers to understand these issues.
We make money by featuring products on our site. Compensation received from the providers featured on our site can influence which products we write about as well as where and how products appear on our page, but the order or placement of these products does not influence our assessment or opinions of them, nor is it an endorsement or recommendation for them.
Products marked as 'Top Pick', 'Promoted' or 'Advertisement' are prominently displayed either as a result of a commercial advertising arrangement or to highlight a particular product, provider or feature. Finder may receive remuneration from the Provider if you click on the related link, purchase or enquire about the product. Finder's decision to show a 'promoted' product is neither a recommendation that the product is appropriate for you nor an indication that the product is the best in its category. We encourage you to use the tools and information we provide to compare your options.
Where our site links to particular products or displays 'Go to site' buttons, we may receive a commission, referral fee or payment when you click on those buttons or apply for a product. You can learn more about how we make money.
When products are grouped in a table or list, the order in which they are initially sorted may be influenced by a range of factors including price, fees and discounts; commercial partnerships; product features; and brand popularity. We provide tools so you can sort and filter these lists to highlight features that matter to you.
Please read our website terms of use and privacy policy for more information about our services and our approach to privacy.